This page shows you how to run GATK4 using our recently installed Singularity GATK4 container. The runAsPipeline script, accessible through the rcbio/1.0 module, converts the bash script into a pipeline that easily submits jobs to the Slurm scheduler for you.
Features of the this pipeline:
- Given a sample sheet, generate folder structure for data processing
- Submit each step as a cluster job using
sbatch. - Automatically arrange dependencies among jobs.
- Email notifications are sent when each job fails or succeeds.
- If a job fails, all its downstream jobs automatically are killed.
- When re-running the pipeline on the same data folder, if there are any unfinished jobs, the user is asked to kill them or not.
- When re-running the pipeline on the same data folder, the user is asked to confirm to re-run or not if a step was done successfully earlier.
Please read below for an example.
The workflows are downloaded from: https://github.com/gatk-workflows/gatk4-data-processing and https://github.com/gatk-workflows/gatk4-somatic-snvs-indels
Jump start
Here are the commands to test out the workflow using example data. The whole run need a few hours if the cluster is not busy.
ssh user123@o2.hms.harvard.edu

# set up screen software: https://wiki.rc.hms.harvard.edu/pages/viewpage.action?pageId=20676715
cp /n/shared_db/misc/rcbio/data/screenrc.template.txt ~/.screenrc

screen

srun --pty -p interactive -t 0-12:0:0 --mem 16000MB -n 2 /bin/bash

mkdir -p /n/scratch3/users/${USER:0:1}/$USER/testGATK4

cd /n/scratch3/users/${USER:0:1}/$USER/testGATK4

module load gcc/6.2.0 python/2.7.12

export PATH=/n/shared_db/singularity/hmsrc-gatk/bin:/home/ld32/rcbioDev/bin:/opt/singularity/bin:$PATH

# setup database. Only need run this once. It will setup database in home, so make sure you have at least 5G free space at home.
setupDB.sh


cp /n/shared_db/singularity/hmsrc-gatk/scripts/* .

buildSampleFoldersFromSampleSheet.py sampleSheet.xlsx

runAsPipeline fastqToBam.sh "sbatch -p short --mem 4G -t 1:0:0 -n 1" noTmp run 2>&1 | tee output.log

# check email or use this command to see the workflow progress
squeue -u $USER -o "%.18i %.9P %.28j %.8u %.8T %.10M %.9l %.6D %R %S"

# After all jobs finish run, run this command to start database, and keep it running in background
runDB.sh  &

java -XX:+UseSerialGC -Dconfig.file=your.conf -jar /n/shared_db/singularity/hmsrc-gatk/cromwell-43.jar run processing-for-variant-discovery-gatk4.wdl -i unmappedBams/group1/in.json 2>&1 | tee -a group1.log

java -XX:+UseSerialGC -Dconfig.file=your.conf -jar /n/shared_db/singularity/hmsrc-gatk/cromwell-43.jar run processing-for-variant-discovery-gatk4.wdl -i unmappedBams/group2/in.json 2>&1 | tee -a group2.log

setupJson.sh

java -XX:+UseSerialGC -Dconfig.file=your.conf -jar /n/shared_db/singularity/hmsrc-gatk/cromwell-43.jar run mutect2.wdl -i unmappedBams/exon.json && findVCF.sh

# Stop database
killall runDB.sh
Details
Log on to O2
If you need help connecting to O2, please review the Using Slurm Basic wiki page.
From Windows, use the graphical PuTTY program to connect to o2.hms.harvard.edu and make sure the port is set to the default value of 22.
From a Mac Terminal, use the ssh command, inserting your eCommons ID instead of user123:
ssh user123@o2.hms.harvard.edu

# set up screen software: https://wiki.rc.hms.harvard.edu/pages/viewpage.action?pageId=20676715
cp /n/shared_db/misc/rcbio/data/screenrc.template.txt ~/.screenrc

screen  # start screen session. For detail: https://wiki.rc.hms.harvard.edu/pages/viewpage.action?pageId=20676715
Start interactive job, and create working folder
srun --pty -p interactive -t 0-12:0:0 --mem 16000MB -n 2 /bin/bash

mkdir -p /n/scratch3/users/${USER:0:1}/$USER/testGATK4
cd /n/scratch3/users/${USER:0:1}/$USER/testGATK4
Load the pipeline related modules
# This will setup the path and environmental variables for the pipeline
module load gcc/6.2.0 python/2.7.12
export PATH=/n/shared_db/singularity/hmsrc-gatk/bin:/home/ld32/rcbioDev/bin:$PATH


# setup database. Only need run this once. It will setup database in home, so make sure you have at least 5G free space at home.
setupDB.sh
Build some testing data in the current folder
cp /n/shared_db/singularity/hmsrc-gatk/scripts/* .
buildSampleFoldersFromSampleSheet.py sampleSheet.xlsx
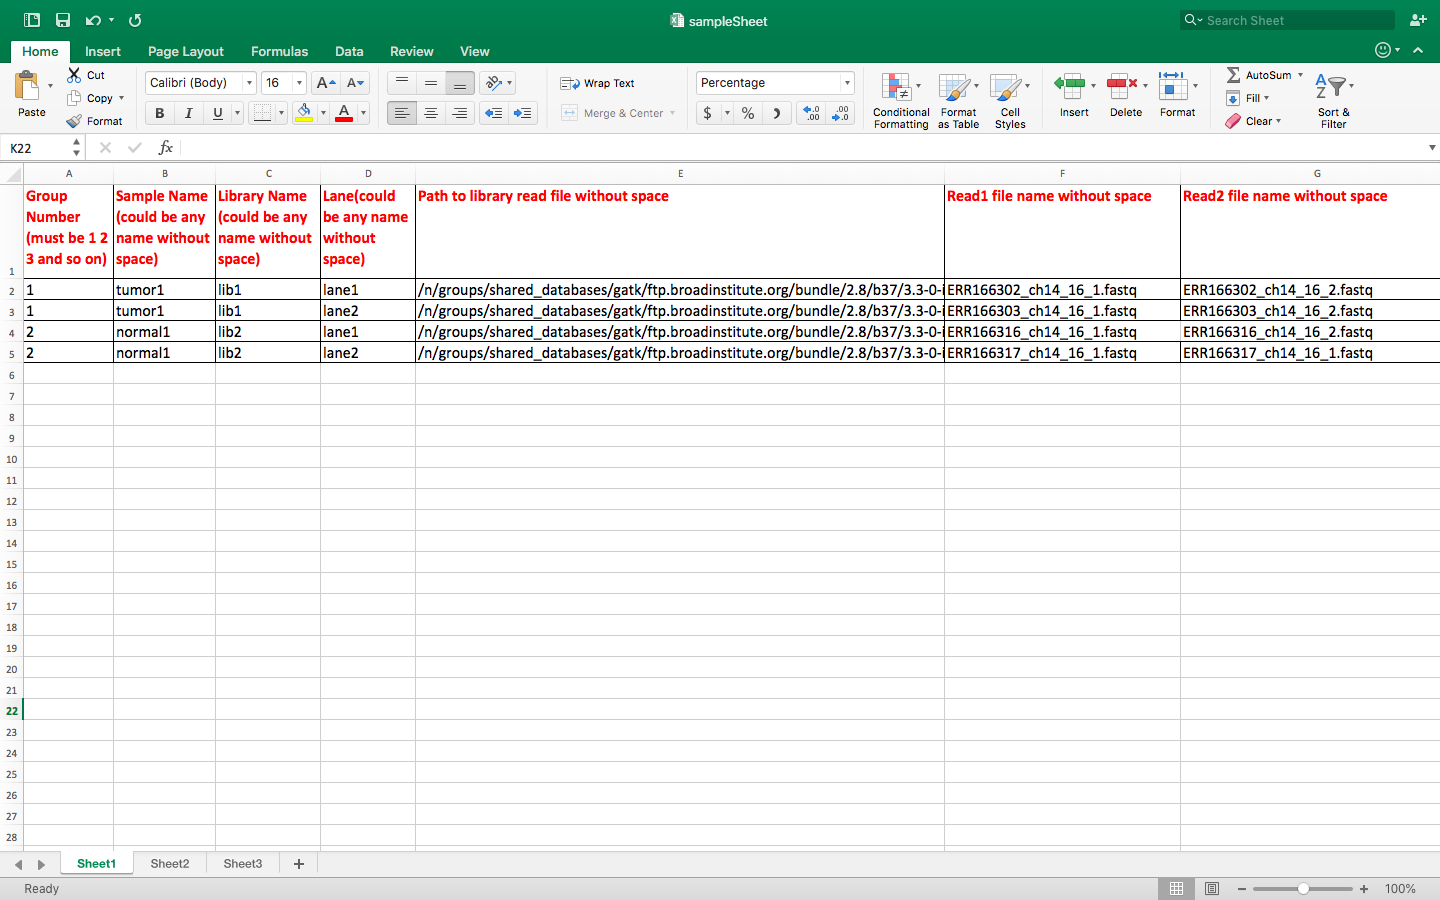
Take a look at the example files
# this command shows the content of newly created folders
ls -l group*/*

# Below is out of the ls command
group1/tumor1:

total 74K
lrwxrwxrwx 1 ld32 rccg 120 Jul 19 08:43 lib1_lane1_1.fq -> /n/groups/shared_databases/gatk/ftp.broadinstitute.org/bundle/2.8/b37/3.3-0-in/group1/patient1/ERR166302_ch14_16_1.fastq
lrwxrwxrwx 1 ld32 rccg 120 Jul 19 08:43 lib1_lane1_2.fq -> /n/groups/shared_databases/gatk/ftp.broadinstitute.org/bundle/2.8/b37/3.3-0-in/group1/patient1/ERR166302_ch14_16_2.fastq
lrwxrwxrwx 1 ld32 rccg 120 Jul 19 08:43 lib1_lane2_1.fq -> /n/groups/shared_databases/gatk/ftp.broadinstitute.org/bundle/2.8/b37/3.3-0-in/group1/patient1/ERR166303_ch14_16_1.fastq
lrwxrwxrwx 1 ld32 rccg 120 Jul 19 08:43 lib1_lane2_2.fq -> /n/groups/shared_databases/gatk/ftp.broadinstitute.org/bundle/2.8/b37/3.3-0-in/group1/patient1/ERR166303_ch14_16_2.fastq

group2/normal1:
total 8.0K
lrwxrwxrwx 1 ld32 rccg 121 Jul 19 08:43 lib2_lane1_1.fq -> /n/groups/shared_databases/gatk/ftp.broadinstitute.org/bundle/2.8/b37/3.3-0-in/group2/control1//ERR166316_ch14_16_1.fastq
lrwxrwxrwx 1 ld32 rccg 121 Jul 19 08:43 lib2_lane1_2.fq -> /n/groups/shared_databases/gatk/ftp.broadinstitute.org/bundle/2.8/b37/3.3-0-in/group2/control1//ERR166316_ch14_16_2.fastq
lrwxrwxrwx 1 ld32 rccg 121 Jul 19 08:43 lib2_lane2_1.fq -> /n/groups/shared_databases/gatk/ftp.broadinstitute.org/bundle/2.8/b37/3.3-0-in/group2/control1//ERR166317_ch14_16_1.fastq
lrwxrwxrwx 1 ld32 rccg 121 Jul 19 08:43 lib2_lane2_2.fq -> /n/groups/shared_databases/gatk/ftp.broadinstitute.org/bundle/2.8/b37/3.3-0-in/group2/control1//ERR166317_ch14_16_1.fastq
The original bash script
less fastqToBam.sh


# Here is the content of fastqToBam.sh
#!/bin/sh

module load gcc/6.2.0 python/2.7.12 java/jdk-1.8u112 samtools/1.9 bwa/0.7.17

[ -d group2 ] || { echo group2 is not found. You need at least two groups to run this pipeline; exit 1; }

pwdhere=`pwd`

for group in `ls -d group*/|sed 's|[/]||g'`; do
    echo working on group:  $group
    cd $pwdhere/$group
    for sample in `ls -d */|sed 's|[/]||g'`; do
        rm $pwdhere/unmappedBams/$group/$sample.inputBamList.txt 2>/dev/null
        mkdir -p $pwdhere/unmappedBams/$group/$sample
        echo working on sample: $sample
        for r1 in `ls $sample/*_1.fastq $sample/*_1.fq 2>/dev/null`; do
            readgroup=${r1#*/}
            readgroup=${readgroup%_*}
            r2=${r1%_*}_2${r1##*_1}
            echo working on readgroup: $readgroup
                        [[ -f $r2 ]] || { echo -e "\n\n!!!Warning: read2 file '$r2' not exist, ignore this warning if you are working with single-end data\n\n"; r2=""; }

            #@1,0,fastqToSam,,sbatch -p short -t 0-4 --mem 4G
            java -XX:+UseSerialGC -Xmx8G -jar /n/app/picard/2.8.0/bin/picard-2.8.0.jar FastqToSam \
               	FASTQ=$r1 \
                FASTQ2=$r2 \
                OUTPUT=$pwdhere/unmappedBams/$group/$sample/$readgroup.bam \
                READ_GROUP_NAME=${readgroup##*_} \
                SAMPLE_NAME=$sample \
                LIBRARY_NAME=${readgroup%%_*} \
                PLATFORM_UNIT=H0164ALXX140820.2 \
                PLATFORM=illumina \
                SEQUENCING_CENTER=BI \
                RUN_DATE=2014-08-20T00:00:00-0400

				echo $pwdhere/unmappedBams/$group/$sample/$readgroup.bam >> $pwdhere/unmappedBams/$group/$sample.inputBamList.txt
        done
        sed "s/sampleName/$sample/; s/inputBamList.txt/${pwdhere//\//\\/}\/unmappedBams\/$group\/$sample.inputBamList.txt/" $pwdhere/processing-for-variant-discovery-gatk4-template.json > $pwdhere/unmappedBams/$group/in.json

        break;
    done
done
How does this bash script work?
There is a loop that goes through the two group folders and samples, convert the fastq files into unmapped bam files
These comments are recgnized by our pipeline runner and the command following them are submitted as slurm jobs:
#@1,0,fastqToSam,,sbatch -p short -t 0-4 --mem 4G # means this is step 1, depends on nothing, and use 4 hours and 4G memory
Test run the modified bash script as a pipeline
runAsPipeline fastqToBam.sh "sbatch -p short -t 10:0 -n 1" useTmp
This command will generate new bash script named slurmPipeLine.201907200946.sh in flag folder (201907200946 is the timestamp that runAsPipeline was invoked at). Then test run it, meaning does not really submit jobs, but only create a fake job id, 123 for each step. If you were to append run at the end of the command, the pipeline would actually be submitted to the Slurm scheduler.
Ideally, with 'useTmp', the software should run faster using local /tmp disk space for database/reference than the network storage. For this workflow, we don't need it.
Sample output from the test run
Note that only step 2 used -t 50:0, and all other steps used the default -t 10:0. The default walltime limit was set in the runAsPipeline command, and the walltime parameter for step 2 was set in the bash_script_v2.sh
Run the pipeline
Thus far in the example, we have not actually submitted any jobs to the scheduler. To submit the pipeline, you will need to append the run parameter to the command. If run is not specified, test mode will be used, which does not submit jobs and gives theplaceholder of 123 for jobids in the command's output.
runAsPipeline fastqToBam.sh   "sbatch -p short --mem 4G -t 1:0:0 -n 1" noTmp run 2>&1 | tee output.log


# You should see something similar as above. But this time, the pipeline runner really submitted all the jobs
# Below is the output
Fri Jul 19 10:07:29 EDT 2019
Runing: /home/ld32/rcbioDev/bin/runAsPipeline fastqToBam.sh sbatch -p short --mem 4G -t 1:0:0 -n 1 noTmp run
module list:

Currently Loaded Modules:
  1) java/jdk-1.8u112   2) gcc/6.2.0   3) python/2.7.12


converting fastqToBam.sh to flag/slurmPipeLine.201907191007.run.sh

find loop start: for group in `ls -d group*/|sed 's|[/]||g'`; do

find loop start: for sample in `ls -d */|sed 's|[/]||g'`; do

find loop start: for r1 in `ls $sample/*_1.fastq $sample/*_1.fq 2>/dev/null`; do

find job marker:
#@1,0,fastqToSam,,sbatch -p short -t 0-4 --mem 4G
sbatch options: sbatch -p short -t 0-4 --mem 4G

find job:
java -Xmx8G -jar /n/app/picard/2.8.0/bin/picard-2.8.0.jar FastqToSam \


...


step: 1, depends on: 0, job name: fastqToSam, flag: fastqToSam.group2.normal1.normal1/lib2_lane2_1.fq
depend on no job
sbatch -p short -t 0-4 --mem 4G --mail-type=FAIL --nodes=1  -J 1.0.fastqToSam.group2.normal1.normal1_lib2_lane2_1.fq -o /n/groups/rccg/ld32/SingularityGATK1/flag/1.0.fastqToSam.group2.normal1.normal1_lib2_lane2_1.fq.out -e /n/groups/rccg/ld32/SingularityGATK1/flag/1.0.fastqToSam.group2.normal1.normal1_lib2_lane2_1.fq.out /n/groups/rccg/ld32/SingularityGATK1/flag/1.0.fastqToSam.group2.normal1.normal1_lib2_lane2_1.fq.sh
# Submitted batch job 46108236
...

All submitted jobs:
job_id       depend_on              job_flag
46108220    null                  1.0.fastqToSam.group1.tumor1.tumor1_lib1_lane1_1.fq
46108224    null                  1.0.fastqToSam.group1.tumor1.tumor1_lib1_lane2_1.fq
46108232    null                  1.0.fastqToSam.group2.normal1.normal1_lib2_lane1_1.fq
46108236    null                  1.0.fastqToSam.group2.normal1.normal1_lib2_lane2_1.fq

---------------------------------------------------------
Monitoring the jobs
You can use the command:
squeue -u $USER -o "%.18i %.9P %.28j %.8u %.8T %.10M %.9l %.6D %R %S"
To see the job status (running, pending, etc.). You also get two emails for each step, one at the start of the step, one at the end of the step.
Check job logs
You can use the command:
ls -l flag
This command list all the logs created by the pipeline runner. *.sh files are the slurm scripts for eash step, *.out files are output files for each step, *.success files means job successfully finished for each step and *.failed means job failed for each steps.
You also get two emails for each step, one at the start of the step, one at the end of the step.
Re-run the pipeline in case some jobs fail
You can rerun this command in the same folder
runAsPipeline fastqToBam.sh "sbatch -p short --mem 4G -t 1:0:0 -n 1" noTmp run 2>&1 | tee output.log
This command will check if the earlier run is finished or not. If not, ask user to kill the running jobs or not, then ask user to rerun the successfully finished steps or not. Click 'y', it will rerun, directly press 'enter' key, it will not rerun.
Call variance:
# start database and let it run in background (& allow the command keep running in background)
runDB.sh &
java -XX:+UseSerialGC -Dconfig.file=your.conf -jar /n/shared_db/singularity/hmsrc-gatk/cromwell-43.jar run processing-for-variant-discovery-gatk4.wdl -i unmappedBams/group1/in.json 2>&1 | tee -a group1.log


java -XX:+UseSerialGC -Dconfig.file=your.conf -jar /n/shared_db/singularity/hmsrc-gatk/cromwell-43.jar run processing-for-variant-discovery-gatk4.wdl -i unmappedBams/group2/in.json 2>&1 | tee -a group2.log


setupJson.sh


java -XX:+UseSerialGC -Dconfig.file=your.conf -jar /n/shared_db/singularity/hmsrc-gatk/cromwell-43.jar run mutect2.wdl -i unmappedBams/exon.json && findVCF.sh

# Stop the database
killall runDB.sh
To run the workflow on your own data
To instead run workflow on your own data, transfer the sample sheet to your local machine following this wiki page and modify the sample sheet. Then you can transfer it back to O2 under your account, then go to the build folder structure step.
Let us know if you have any questions. Please include your working folder and commands used in your email. Any comment and suggestion are welcome!